
Thursday, February 10, 2011
Jailbreak iOS 4.1 iPhone, iPod, iPad [Windows/Mac/Linux][How To]

Update : Added Sn0wbreeze and Custom iOS 4.1 Firmwares at the end
Here are the different guides to jailbreak your iDevice running iOS 4.1 :
MAC - Pwnage Tool
- AppleTV 2G
- iPad (firmware 3.2.2)
- iPod touch 4G
- iPod touch 3G
- iPhone4
- iPhone 3GS
- iPhone 3G
WINDOWS / MAC / LINUX - Greenpois0n
- iPhone 4
- iPhone 3GS
- iPhone 3G (soon with RC5 release)
- iPod touch 2G
- iPod touch 3G
- iPod touch 4G
- iPad (firmware 3.2.2)
WINDOWS / MAC - limera1n
- AppleTV 2G
- iPad (firmware 3.2.2)
- iPod touch 4G
- iPod touch 3G
- iPhone4
- iPhone 3GS
WINDOWS - Redsn0w 0.9.6
- iPhone 3G
- iPod touch 2G
WINDOWS - Sn0wbreeze 2.1
- iPhone 3G
- iPhone 3Gs
- iPhone 4
- iPod Touch 2G
- iPod Touch 3G
- iPod Touch 4G
- iPad (both models)
- Apple TV 2G
2:06 PM 0
Custom Firmwares for iOS 4.1 Jailbroken for all iDevice
Below are various different custom firmware files that were created using Pwnage Tool 4.1 download these if you are weary of creating your own. Your device MUST be in pwned-DFU mode for these firmware files to restore properly(read below). Make sure you read the description of each firmware CAREFULLY so that you know what you are installing.

*IMPORTANT* In order to restore these custom firmware files, you must use Pwnage Tool(Mac) to enter DFU mode. If you have Windows, you can now use Redsn0w 0.9.6b2 to enter pwned-dfu mode which will allow you to install the custom firmware files. You must use one of these methods in order for the restore to work or you will get iTunes errors.
iPhone 4 Custom 4.1 Firmware
1. iPhone 4 4.1 UNACTIVATED- Works for iPhone 4
- Not Activated
- 1000 MB Root Partition
- Packages Installed
-Cydia
-OpenSSH
Part 1
Part 2
Part 3
2. iPhone 4 4.1 ACTIVATED
- Works for iPhone 4
- Activated
- 1000 MB Root Partition
- Packages Installed
-Cydia
-OpenSSH
– After restoring with this firmware you will need to add the repo http://repo666.ultrasn0w.com and install ultrasn0w to unlock your device
Part 1
Part 2
Part 3
iPhone 3Gs Custom 4.1 Firmware
1. iPhone 3Gs 4.1 UNACTIVATED- Works for iPhone 3Gs
- Not Activated
- 1000 MB Root Partition
- Packages Installed
- Cydia
- OpenSSH
Part 1
Part 2
2. iPhone 3Gs 4.1 ACTIVATED
- Works for iPhone 3Gs
- Not Activated
- 1000 MB Root Partition
- Packages Installed
- Cydia
- OpenSSH
Part 1
Part 2
iPhone 3G Custom 4.1 Firmware
1. iPhone 3G 4.1 UNACTIVATED/Nothing Enabled- Works for iPhone 3G
- Not Activated
- NOTHING ENABLED: Multitasking, Homescreen Wallpaper, Battery Percentage Indicator
- 800 MB Root Partition
- Packages Installed
- Cydia
- OpenSSH
- Custom Boot & Restore Logos
– This version DOES NOT come with Multitasking, Homescreen Wallpaper, Battery Percentage Indicator ENABLED. You can still enable it manually if you would like using other methods.
Part 1
Part 2
2. iPhone 3G 4.1 UNACTIVATED/Everything Enabled
- Works for iPhone 3G
- Not Activated
- EVERYTHING ENABLED: Multitasking, Homescreen Wallpaper, Battery Percentage Indicator
- 800 MB Root Partition
- Packages Installed
- Cydia
- OpenSSH
- Custom Boot & Restore Logos
– This version comes with Multitasking, Homescreen Wallpaper, Battery Percentage Indicator ENABLED.
Part 1
Part 2
3. iPhone 3G 4.1 ACTIVATED/Nothing Enabled
- Works for iPhone 3G
- Activated
- NOTHING ENABLED: Multitasking, Homescreen Wallpaper, Battery Percentage Indicator
- 800 MB Root Partition
- Packages Installed
- Cydia
- OpenSSH
- Custom Boot & Restore Logos
– After restoring with this firmware you will need to add the repo http://repo666.ultrasn0w.com and install ultrasn0w to unlock your device
– This version DOES NOT come with Multitasking, Homescreen Wallpaper, Battery Percentage Indicator ENABLED. You can still enable it manually if you would like using other methods.
Part 1
Part 2
4. iPhone 3G 4.1 ACTIVATED/Everything Enabled
- Works for iPhone 3G
- Activated
- EVERYTHING ENABLED: Multitasking, Homescreen Wallpaper, Battery Percentage Indicator
- 800 MB Root Partition
- Packages Installed
- Cydia
- OpenSSH
- Custom Boot & Restore Logos
– After restoring with this firmware you will need to add the repo http://repo666.ultrasn0w.com and install ultrasn0w to unlock your device
– This version comes with Multitasking, Homescreen Wallpaper, Battery Percentage Indicator ENABLED.
Part 1
Part 2
iPod Touch 4G Custom 4.1 Firmware
1. iPod Touch 4G- Works for iPod Touch 4
- 900 MB Root Partition
- Packages Installed
- Cydia
- OpenSSH
Part 2
Part 3
iPod Touch 3G Custom 4.1 Firmware
1. iPod Touch 3G- Works for iPod Touch 3
- 900 MB Root Partition
- Packages Installed
- Cydia
- OpenSSH
Part 2
iPad Custom 3.2.2 Firmware
1. iPad- Works for iPad
- 1200 MB Root Partition
- Packages Installed
- Cydia
- OpenSSH
Part 2
Part 3
—————————————————————————————
The iPhone 3G firmware files use custom boot and recovery screens, at this time, the iPhone 3G is the ONLY device that supports custom logos. The logos used in these firmware files can be seen below:
1:17 PM 0
Boot logo changer [Animated logo]
Animate became Boot Logo on Cydia, this is a tweak of chronicdev freely available on BigBoss's repository on Cydia.

This tweak will allow you to change the boot logo image when you start your iDevice and that during a respring only for jailbroken with iDevices Greenpois0n.
Preamble
- Only for jailbroken iDevices with Greenpois0n.
- Does not work with a jailbreak untethered (Monte) via redsn0w.
- Make sure you have the dependencies PrefrenceLoader Cydia (developer mode).
- Learn to connect via ssh on his iDevice.
- Send pictures in. Png 640 × 960 for the Model Retina and 320 × 480 for others, 1024 × 1024 for the IPAD.

Guide
- Install from Cydia bootlogo 1.0.0-7 (the latter seems to have disappeared) or deb.
- Then go to Library / BootLogos /.
- Create a folder (the name does not matter).
- Place your images. 0.png png named as such, 1.png, 2.png and so on.

- Then go to "Settings" of your iDevice.
- Then, in "Boot Logos" folder and create your selction.
- Reboot.

If it works yet, since MobileTerminal:
- Please log in as root, type "su" and password "alpine" (default).
- Then type this command line:
chown-R mobile: mobile / Library / BootLogos /

Theme packages are also available for bootlogo via Cydia. Ex: Shattering Apple.
You can try with a single image. Png or more images. Png, or image. Gif (0.gif)
Boot Logo via iSpazio.



Download
9:04 AM 0
Tuesday, February 8, 2011
Verizon iPhone 4 jailbroken using updated Greenpois0n [How to]
Members of Chronic Dev Team has just released Greenpois0n RC5.4 for Mac OS X that allows you to jailbreak Verizon iPhone 4 for life. The team has posted an image of jailbroken CDMA iPhone on Verizon network which clearly shows Cydia running on it.

Early adopters of Verizon iPhone 4 can use the instructions posted here to jailbreak your Verizon iPhone 4 on iOS 4.2.6. Windows version of the tool should be released soon. Stay tuned! [Twitter]
Download Greenpois0n RC5.4 for Mac OS X
Download iOS 4.2.6 for Verizon iPhone 4
4:54 AM 0
Monday, February 7, 2011
Update iPhone 4 to 4.2.1and Preserve Baseband 01.59.00 [Full Guide]
This tutorial will show you how to upgrade your iPhone 4 to iOS 4.2.1 without upgrading its baseband using TinyUmbrella for Windows.

Step One

Step Two
Double click the downloaded TinyUmbrella.exe file.

If you get a Windows Firewall notification, check both boxes and click Allow Access.

Step Three
Make sure the device is connected, and Umbrella has detected the type of device and its firmware.

**If you haven't already saved your iOS 4.2.1 SHSH blobs then click Save SHSH. Make sure they successfully save before continuing.

Step Four
Hit Start TSS Server and make sure you receive no errors.

Once The TSS Server is "running" successfully, umbrella will kill iTunes. Leave TinyUmbrella Open. You can double check to see if the TSS server is running under the Log tab.

If you do receive an error, DO NOT continue. Your restore will not work if the TSS server cannot be started.
Step Five
Open iTunes by doubling clicking its icon in the dock.

Hold down the Shift key and click Restore

Select your iPhone 4.2.1 firmware file from the popup window that appears and click Open.

Click Restore to begin restoring your device.

Step Six
iTunes should give you error 1013. This is what we wanted, as it notes the baseband has not updated :) Click Ok and close iTunes.
If you get a 16XX error then try entering DFU and go to step 5.
If your restore does NOT end in a 1013, it means your baseband was updated. This is likely because you did not have the TSS server running OR you updated without TinyUmbrella OR you are working with a device OTHER than iPhone 4.
Step Seven
Place your iPhone into DFU mode by holding down both the Power and Home buttons for ten seconds, then release the Power button and continue holding the Home button for another 5 seconds. You can find help with DFU mode here.

Step Eight
You are now ready to follow our Greenpois0n tutorial which will jailbreak your device and bring it out of DFU mode. **Note: You do not need to put the device into DFU mode after press the Jailbreak button in Greenpois0n as we have already done this :)

Step Nine
Your iPhone will now be on 4.2.1 with the 1.59.00 baseband! (Which means you can now unlock using this tutorial)

8:49 AM 0
Jailbreak 4.2.1 Greenpois0n for Windows [Full Guide]
This is how to jailbreak iPhone 3GS and iPhone 4 using Greenpois0n for Windows. Greenpois0n supports the iOS 4.1 and iOS 4.2.1 firmware. Use Limera1n if you want to jailbreak iOS 4.0, iOS 4.0.1, iOS 4.0.2.
Note: Do not update to iOS 4.2.1 if you need the unlock.
Ultrasn0w does not support that baseband yet. The only exception is the iPhone 4. You can update to iOS 4.2.1 without upgrading your baseband by following this tutorial.
Step One
Open your web browser of choice and navigate to http://www.greenpois0n.com. Click the Windows link at the bottom of the screen.
Step Two
When prompted save the download to your desktop
Step Three
Double click the downloaded gp_win_rc5_b2.zip file then drag the greenpois0n.exe file to the desktop.
Double greenpois0n.exe from the desktop to launch the application

Step Four
Power off your iPhone then click the large Prepare to Jailbreak (DFU) button
Step Five
You will now be instructed on how to place your iPhone into DFU mode. You can get help with this here.
You will be asked to press and hold the sleep button for 2 seconds.
Continue holding sleep; press and hold home for 10 seconds.
Release sleep button; continue holding home for 15 seconds.
Step Six
Once your iPhone is successfully in DFU mode you may click the Jailbreak button.
Step Seven
Greenpois0n will now jailbreak your device
Step Eight
Click the Quit button once the software application has completed.
You'll notice some verbose mode text scrolling on your device.
Step Nine
After the iPhone restarts you'll notice a new Loader application on your Springboard. Press to launch it.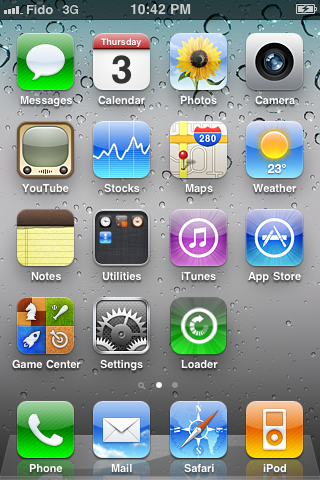
Step Ten
Press to select Cydia then press the large Install Cydia button that appears.


Step Eleven
Once Cydia has installed successfully you can remove Loader by pressing the Options button then the large red Remove Loader.app button.


Step Twelve
Restart your iPhone then run Cydia. Let it do all the necessary updates then follow our Unlock tutorial if possible for your device.

7:34 AM 0
These are instructions on how to jailbreak your iPhone 3GS and iPhone 4 using Greenpois0n for Windows. Greenpois0n supports the iOS 4.1 and iOS 4.2.1 firmware. Use Limera1n if you want to jailbreak iOS 4.0, iOS 4.0.1, iOS 4.0.2.
Remember: Do not update to iOS 4.2.1 if you need the unlock. Ultrasn0w does not support that baseband yet. The only exception is the iPhone 4. You can update to iOS 4.2.1 without upgrading your baseband by following this tutorial.
Step One
Open your web browser of choice and navigate to http://www.greenpois0n.com. Click the Windows link at the bottom of the screen.
Step Two
When prompted save the download to your desktop
Step Three
Double click the downloaded gp_win_rc5_b2.zip file then drag the greenpois0n.exe file to the desktop. Double greenpois0n.exe from the desktop to launch the application
Step Four
Power off your iPhone then click the large Prepare to Jailbreak (DFU) button
Step Five
You will now be instructed on how to place your iPhone into DFU mode. You can get help with this here.
You will be asked to press and hold the sleep button for 2 seconds.
Continue holding sleep; press and hold home for 10 seconds.
Release sleep button; continue holding home for 15 seconds.
Step Six
Once your iPhone is successfully in DFU mode you may click the Jailbreak button.
Step Seven
Greenpois0n will now jailbreak your device
Step Eight
Click the Quit button once the software application has completed.
You'll notice some verbose mode text scrolling on your device.
Step Nine
After the iPhone restarts you'll notice a new Loader application on your Springboard. Press to launch it.
Step Ten
Press to select Cydia then press the large Install Cydia button that appears.
Step Eleven
Once Cydia has installed successfully you can remove Loader by pressing the Options button then the large red Remove Loader.app button.
Step Twelve
Restart your iPhone then run Cydia. Let it do all the necessary updates then follow our Unlock tutorial if possible for your device.
***A big thanks goes everyone who made this jailbreak possible.
6:43 AM 0


